Showing posts with label our home. Show all posts

Friday, December 11, 2020

Gift Wrap Scheme 2020: Blue & White

Gosh, y'all. I'm out here, surviving, trying to use up produce, doing my make-up frantically at my desk before Zoom meetings like the rest of you. The holiday season seemed to hit me in the face this year, and I've done more online shopping in the past two weeks than maybe my entire life. 

One of the bright spots of this was the revelation I could maybe, perhaps, finally realize my gift wrap dream: a blue-and-white scheme that was not comprised of Hanukkah or baby shower wrapping paper. I'm a sucker for the timeless combo and go weak in the knees for Wedgwood, Spode, Delft and Meissen. 

Usually I pick up my papers while I'm out and about Christmas shopping at Target, Paper Source and TJ Maxx. But this year, I'm staying close to home and decided to nab some paper online, hoping to support some small businesses at the same time.

Cue Carrie Bradshaw voice: "I couldn't help but wonder...could my white whale wrapping paper be lurking right there on the internet?"

And reader, the lovely designers on Etsy and Society 6 speak my love language, and I think this combo may have exceeded my wildest dreams. 


I scooped up the following rolls, supplemented with some sheets of scrapbook paper (that's my favorite hack for small gifts):

When I compiled my wedding registry 10 years ago and was trying to pick china, I really couldn't commit to a pattern and was not hurt one bit when no one bought any of it. They must have sensed it wasn't meant to be. A few years later I decided to embrace my noncommittal attitude and started buying mismatched blue-and-white and it was the best decision. I'm so delighted to recreate my collection in this cheeky paper mix!


This is, also, the very first time I've allowed red and green in my Christmas wrapping scheme! A momentous occasion. I picked up some moss green and red ribbon options, along with some fake greenery to zhush up some of the wrapping.


My friend Lauren and I had a nearly 24-hour text discourse the other day about how Staffordshire Dogs suddenly became pop icons (we've decided to give some credit to this Gucci collection). This is, by far, my favorite of the papers I ordered because it's just so damn funny. Granny chic forever!


I'm enjoying gazing at the pile for a couple more days before all these packages get boxed up and FedExed to their destinations. Our cat, Freya, is probably already counting down the hours until she gets the solitude of her Christmas nest back. 


Next year will mark 15 years of doing my Christmas wrapping scheme! Hard to believe. 

If you'd like to take a trip down Christmas wrapping memory lane with me, here you go:

Wednesday, June 10, 2020

DIY Verdigris House Numbers

Hello from the homestead! As COVID has kept us mostly home, we've been tackling lots of home projects and I have to admit: this is maybe one of my favorite DIY's ever.


I'd never given much thought to our house numbers, which is surprising, because I'm very into house number design! I just hadn't thought much about replacing ours until I had a couple packages delivered to the wrong house in the same week. Suddenly it was obvious; our old brass numbers were aged enough they blended in with our wood mailbox post.


I had stumbled upon these beautiful verdigris house numbers on Terrain, but by the time I saw them, they were out of numbers we'd need. I couldn't get them out of my head, though, and one day while we were out on a walk, I wondered aloud if I could DIY a verdigris patina. It turns out the answer is YES.

Verdigris is a blue-green patina that occurs on copper due to oxidation -- it's the reason our Lady Liberty is that beautiful green! It's one of my favorite colors, and is a natural complement to our front door color (Benjamin Moore Wythe Blue).


I was happy to find out you can buy online kits to create the patina yourself. I ordered this Triangle Coatings Patina Green starter kit, which is plenty for just 8 house numbers. For about $25, I was able to revive my existing numbers to create something totally unique!


First, I painted a coat of copper paint on each number and let it get mostly dry before spritzing it with the patina liquid, which I put in a spray bottle. The box says the process takes "minutes," and that's technically true, but I found it took hours. In some cases, I had to reapply both materials to get closer to the color I wanted.


But I got there! I loved this project because it was one of the rare times I saw something, thought "I could do that" and then was able to execute it fairly simply. Very satisfying! And it gives our house a college pottery professor vibe and that's the vibe I'm always trying to project in my life.

Monday, April 20, 2020

New Happy Hour Spot: My Porch

It's wild to think that within about 10 days of my last post, the whole world seemed to change. The threat of a deadly and hyper-contagious virus forced us into our house, where I've been discovering all those lessons learned over the 10 years of becoming "domesticated" are finally coming in handy! I haven't whipped out the sewing machine just yet, but I have made lots of bread, homemade caesar dressing, roasted brussels sprouts with honey sriracha aioli, shepherd's pie, boeuf bourguignon, brioche bread pudding and many, many smoothies.


With few places to go, absolutely no one to see and essentially no ability to make plans, I've been more anxious than ever to make our home the best place to be. So I really fixated on a wish list item that has been slipping down the priority list for six years, but finally had its moment: my dream Lutyens-style bench from Plow & Hearth for the porch. I got the greenlight to make the porch my happy hour destination of choice, where I can sip wine and wave to strangers and admire the dogs of the hood, and it's already upped our curb appeal about 1000%. 

I rounded it out with a wicker side table and cabana bolster pillows from Target and a nice, big geranium that brings me so much joy with its bright pop of red.


Like, seriously, how did we ever NOT have the bench?


From the bench, I can admire this favorite spot of the landscaping we did a few years ago with my mother-in-law. That combo of golden thread cypress, juniper and loropatelum just makes my heart sing.


In the other direction, I can gaze upon this collection of succulents that look great today and will likely be scraggly messes come fall because that's what succulents do.


The porch improvement happened just in time for my first socially distanced visitor! Melissa brought by some paper gold (a.k.a paper towels) and plopped her chair down for a quick visit. It was a delight!


And maybe because she felt bad and knew I needed something to smile about, Mother Nature allowed this one iris to bloom for the first time in a few years. I imagine that's just the schedule it's on, but I like to think it was for me. 

Next up, I'm planning a major sheet mulching overhaul of a hated corner of the backyard, and I can't wait to share more about that someday. 

Monday, March 2, 2020

I Got Hypnotized Into Buying a Rug


It's been a loooooong while since I actually updated about things happening around our house (whoops, remember when I painted the kitchen but have never posted final pictures — someday!), but we do have two new fun arrivals I had to share. One is our precious cat Freya, a 1-year-old tabby we adopted in January who is basically our obsession. The other is a new rug for the den!


I still loved the pattern of our flatweave IKEA rug but it had really seen better days. It had stains of all manner and shape. It was surprisingly hard to clean. And Sean honestly has always been wishing we had a rug with thicker pile in this room.

So when I did our taxes, I suggested we buy an inexpensive rug with some of our tax return and Sean was on board! I scoured all the usual sites, along with Facebook Marketplace and secondhand stores, and developed a crush on the Edessa Tribal Medallion rug that was on super sale. I had been really attracted to oriental-style rugs with pink, and a few of our art pieces in the living room have pink. But what sold me on this rug was that it has almost all the colors in it, so we have a ton of flexibility to change our decor or put it in a different room. Sean liked it, too, and I congratulated myself on my good taste.

But I had to laugh when I realized I have seen this rug dozens of times on the Instagram feed of Young House Love. They recommended it in a different color last year and since then, they've shared every picture people have tagged of it, calling it the "magic rug." I swear, I didn't even realize I had bought the magic rug until I'd done it! I think they hypnotized me with their Insta Stories!

We took the advantage to steam mop the floors with my trusty Bissell PowerFresh Lift-Off steam mop, and then laid out the rug and gave it a pass with the vacuum. It's a big adjustment from the modern pattern of the IKEA rug, but I'm loving it! It's not a crazy tall pile, but it's comfy under foot.


I mean, it looks so good with my book!


And it looks so good with my cat! We'll probably keep both of them.

Wednesday, January 23, 2019

Holy Moly: I Painted a Geometric Tile Backsplash


Like all good DIY-ers, I went into this project with a plan, scrapped it halfway through, and spent approximately 10 more hours than anticipated perfecting it. But in my opinion, every second was worth it because I'm now gazing at my backsplash like it's the multifaceted diamond it almost appears to be.

Here's how it all started.


I was standing in my kitchen a few days after Christmas when it hit me: I don't have to hate my kitchen this much.

I've hated it since the day we toured the house. It was dark, with scuffed wood custom 1981 cabinets that are so custom nothing fits very well — I have cookie sheets that won't even fit.


I hated the precious floral wallpaper, so much so that I ripped it all down a couple years ago on a whim, and then left just a couple scraps peeking out from behind the switch plates I was too lazy to remove.


Perhaps most of all, I hated the Ronald McDonald-themed maroon and yellow backsplash.

Like any red-blooded American woman, I've been fantasizing about my dream kitchen for at least two decades, carefully pinning hardware inspiration to my Pinterest boards. Also like most red-blooded American women, I'm a few thousand short of the budget needed to do the full reno of my dreams. But standing in my kitchen earlier this month, I realized simple paint can solve a lot of ills.

And that's how I ended up painstakingly dotting paint with tiny paintbrushes at midnight.


STEP ONE:
I wiped down the whole backsplash with TSP diluted with water and then wiped that dry, followed by wiping with a tack cloth to be sure every little speck of dust was gone. Then, I sanded the tiles to rough up the glaze a bit. That was somewhat unsuccessful, but it's okay. It's didn't hurt anything to try.

STEP TWO: 
I taped around the perimeter and then painted two coats of Zinsser primer and let that cure for a little while I applied the Marie Kondo tidying method to my upper cabinets.

STEP THREE:
I painted 2-3 coats of some Benjamin Moore White Dove in semi-gloss that I had on hand.


STEP FOUR:
Finally I was ready to enact my plan, which was to use a lovely stencil I purchased from Cutting Edge Stencils to mimic the look of painted tiles. See, look! All taped up.

The bad news is that the stencil — ordered in the smallest size — still wasn't small enough for my tiles and my stubborn self insisted on trying to make it work, even though the design was going to split grout lines.


Spoiler alert: It did not work. It was a smudgy mess. I appear to be the one person who can't handle a stencil.

I nursed my wounds for just a few minutes and then resolved to paint over my failed experiment and start back at square one. Or should I say triangle one?


STEP FIVE: 
I googled around a bit for inspiration and found this One Kings Lane post. I decided to complicate that a bit by adding more colors. Ultimately, I used some samples I had of Sherwin Williams Filmy Green, Magnolia Home Earl Grey and Magnolia Home Stormchaser.

I sketched out my design with Crayola markers and then taped it off, marking dots of paint so I wouldn't accidentally use the wrong color in the wrong spot. I used an X-acto knife to trim the corners to get perfect triangles. And finally, I painted. This whole process required HOURS of carefully peeling and migrating blue tape, repainting and touching up, over two nights. It would have been much more seamless if this had been my first plan all along.


But it was ALL worth it because this is infinity better than that maroon-and-goldenrod combo. It's brighter and it looks like high-end tile!

This is just one of the earliest steps of hopefully many to make the kitchen a happier place that feels "us." Eventually we want to paint the cabinets, replace the hardware, get new appliances and, depending on how our budget looks by then, replace the countertops. In the meantime, we'll just marvel at the power of paint.

Sunday, April 22, 2018

How I Got a New Couch with an Angry Email


Sit down and let me tell you the tale of my proudest accomplishment — fighting for and getting a free sofa from West Elm.

Our story begins back in the fall of 2014. I was so young and naive, I managed to convince myself the beautiful Peggy sofa from West Elm was a wise investment for my very first sofa purchase. It was beautiful nubby gray, with deep seats and my favorite Mad Men-loving detail: tufted upholstery. I figured we'd have it for a very, very long time. I sincerely loved it.


And then we lost the first button. Of many. It turns out unless you perch very lightly, you will inevitably loosen the buttons of the seat cushions. Apparently, tufted seat cushions are basically doomed to fail. I can kick myself for thinking it would work out, but what can I say? I'm an optimist.

After we lost the first two buttons, I reached out to West Elm to see what our options might be and they sent a button replacement kit. It came with incredibly complex instructions, a wooden dowel and extra buttons/thread. It required two people and even then, the force of trying to push the dowel through the thick cushion snapped the wood in half. That probably should have been a sign that this might be more trouble than it's worth. But still, I felt like this is what you sign up for when you buy a tufted sofa!


Until February 2017, when this article appeared on The Awl and went truly viral. It turned out many, many people who purchased the Peggy had experienced the same button loss, pilling fabric and even worse — collapsing legs! Multiple friends forwarded the article to me, saying, "Isn't this your couch?" Um yes...yes it is.

Although we hadn't experienced anything as traumatic as full collapse, we had lost several buttons, observed some loss of shape in the cushions and had pilling fabric. All only three years after buying the sofa! I decided to call the hotline West Elm set up for Peggy owners to see what we could get for our troubles. I ended up talking to a service rep who made it seem that, in the grand scale of bad Peggy problems, ours paled in comparison. She promised they would continue to send button repair kits when necessary. I can only attribute my agreement to Stockholm Syndrome. Somehow, I felt I deserved this pain.


Months passed. When we lost yet more buttons last summer, I decided to reach out again to West Elm for a button replacement kit. I received the response: "We no longer are offering button replacement kits, because the couch has been discontinued. We can offer you 30% off a new sofa."


Um, exsqueeze me???? I literally forwarded the email to my husband with the note, "THEY DON'T EVEN KNOW." And thus began a five-month odyssey to get a new sofa and pay as little as possible.

If I ever win another writing award, it might be for my diatribe email to West Elm customer service, in which I managed to use the word "recompense," hyperlink coverage of the couch's deficiencies and attach a screengrab of prior communications. I basically said I should be entitled to the same refund offered to other owners of the Peggy, especially considering I couldn't possibly sell the couch and expect to get a decent amount of money. Let's just say there's Jimmy Stewart's speech at the end of "Mr. Smith Goes to Washington" and then there was my email to West Elm.

Within 30 minutes I had my answer: West Elm was going to issue me a credit worth nearly $1,200 AND 30% off the purchase once I ordered a replacement sofa. VICTORY!!!!


Ultimately we ordered the Drake, a kissing cousin of the Peggy, but with more durable fabric, firmer cushions and most importantly, no tufted seats. It had to be made to order, so we waited nearly 12 weeks for it to arrive. The delivery men showed up early on Friday and I've spent the weekend making an Amber-sized dent on one side and generally basking in the glow of a hard-won battle.


And that, my friends, is how I managed to upgrade my sofa with an email. Do you need any corporate complaints filed? I seem to have found my calling.

Wednesday, January 10, 2018

Year Three of Home Ownership

Sometime in November, we entered our fourth year of home ownership (!!!). It's easy to feel like nothing is getting accomplished and the house is falling apart for a living, so sometimes I like to step back and really take stock of how far we've come. There are some BIG items I really would love to tackle (ahem, the kitchen) that will just take a little longer than I would have hoped. But we crossed some biggies off the list this past year, including: new front fencing, painted shutters and front door and finally replaced the dining room light fixture. 

Let's climb in the wayback machine and remember the journey:

Curb Appeal


From Day One, I was not feeling the red shutters. For exteriors, I like a classic look and I'm usually pretty partial to black shutters with brick. 


When it came time to paint ours, however, I decided to match the color to the darkest shade of the brick and ended up with a dark, dark charcoal-brown that looks like sealskin. I considered many, many shades for the front door and ended up wimping out and going with my favorite color: Wythe Blue by Benjamin Moore. I can't quit it! I think/hope the exterior is slightly more stately.


I tried and failed — TWICE — to keep boxwoods alive in those planters. I'll start a new hunt soon for a better option. Maybe an evergreen shrub?


Our motion-sensor porch light finally crapped out and I jumped at the chance to replace it. We ended up going with this Capistrano model, which I purchased off Amazon.


It's classic and modern at the same time. 


The biggest item on our agenda was to replace the crumbling front portion of our fence, which our fence guys estimated was original to the house (making it nearly 40 years old).


The new fence is a beaut, and I couldn't resist topping it off with fence jewelry (a.k.a copper post caps). 

Front Room


I can never get over this before picture because the room just looks so, so different. Since buying the house, we've:
  • Removed the railing
  • Put in hardwood floors
  • Removed the wallpaper
  • Painted
  • Added bookshelves
  • Finally hung drapes
  • Finally replaced the dining room light


We had a very hard time agreeing on a light fixture. I wanted something modern and frankly, would have gone a little funkier, but Sean talked me down a bit. We went with the Bautista light fixture from All Modern. 


The dining area before...


And today! We just hung the drapes on Sunday. 


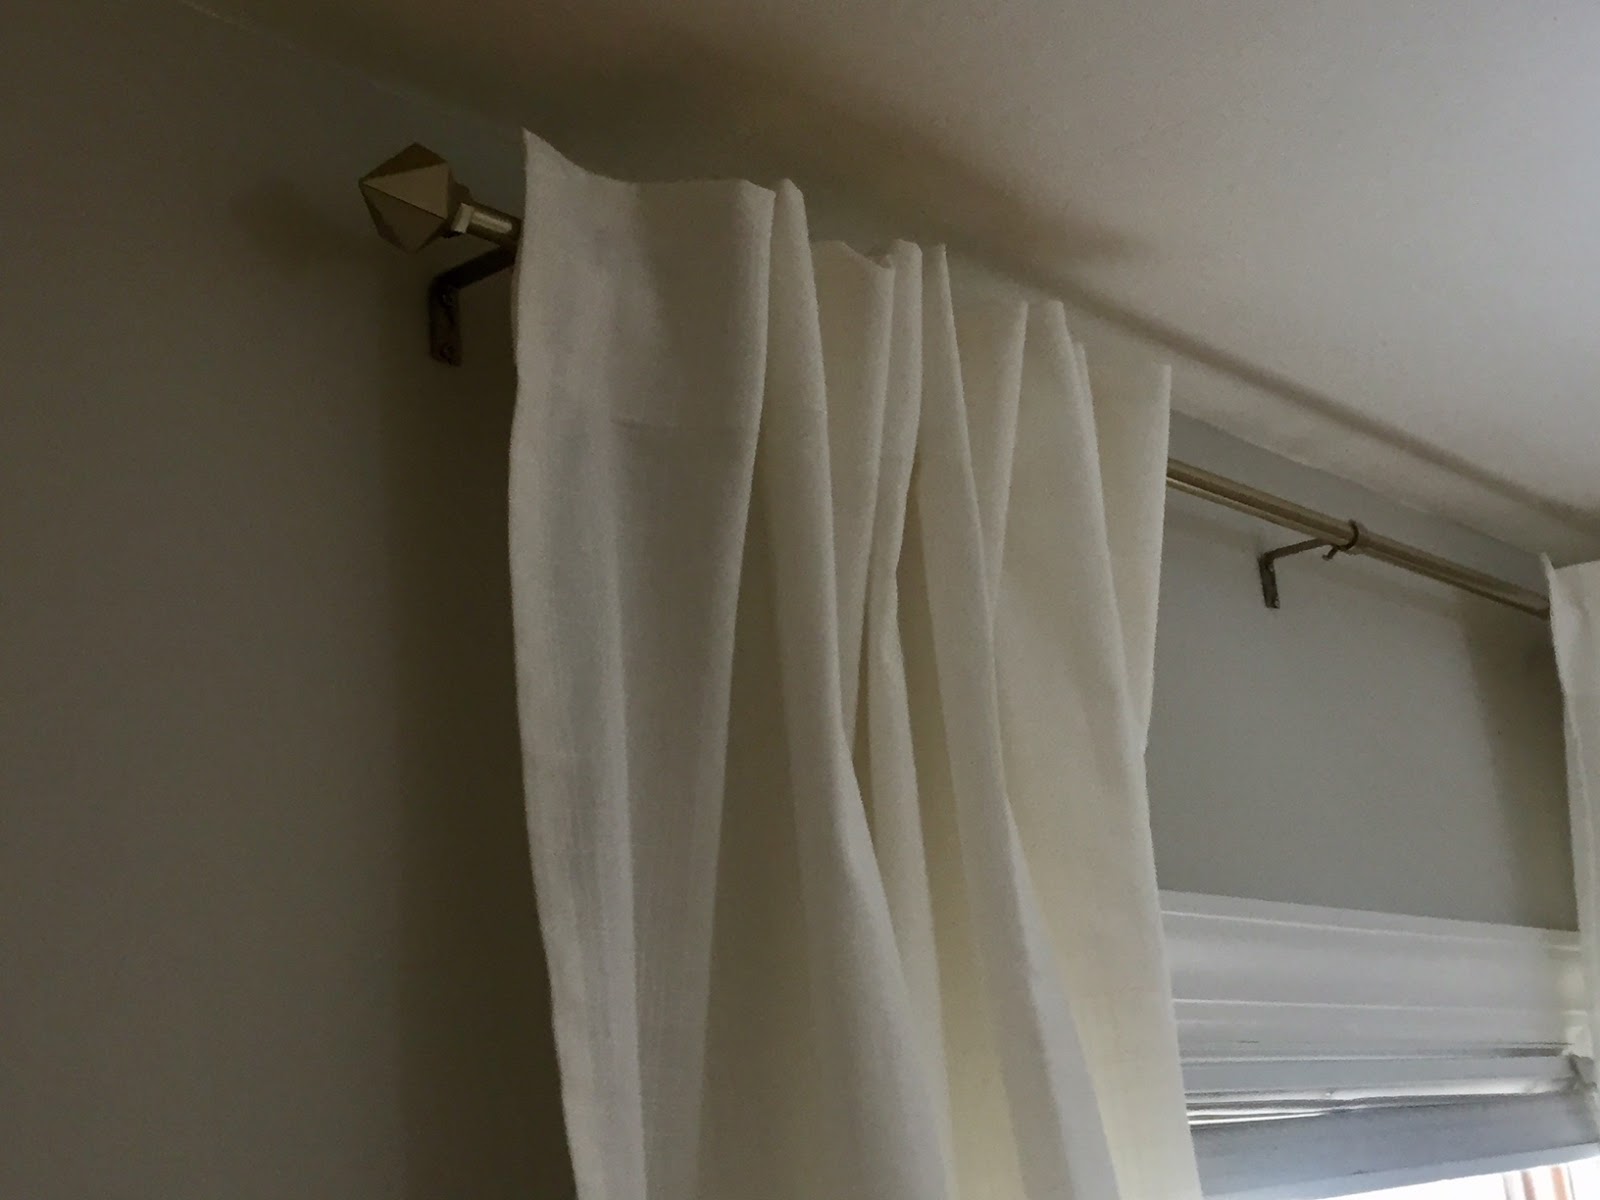
 These are very simple, but very elegant IKEA Ritva drapes that, when hung, can almost have the tailored look of a pinch pleat at the top. They are very long and cost less than you'd spend on four panels at Target that would look half as good. I got the rods at Target. They look like a cross between nickel and muted brass and I love the faceted ends. Modern, but not overly trendy.

Master Bedroom


Wow, this picture reminds me how much I did not like that color. 


In 2017, we added a headboard and just this past weekend, we finally hung some art. The prints are two quotes from our favorite authors that I picked up at a boutique in Provo, Utah:

  • "You have bewitched me body and soul," Jane Austen
  • "We were together, I forget the rest," Walt Whitman
The middle print is by Ashley Goldberg and I think I gave it to Sean wayyyyy back in maybe 2007 or 2008? It reminded me of us. 

So that's year three of the Kennedy Casa! I'm not sure what year four will bring, but I know my to-do list includes:
  • Purging!
  • Framing and hanging more art and getting rid of what doesn't have a place
  • Saving for the kitchen reno and maybe seeing what we can do to make it more enjoyable in the meantime
  • Finally giving some shape and character to Sean's man room
  • Possibly doing some small upgrades to the hall bathroom
  • Updating 1-2 ceiling fans
  • Painting trim that's way overdue for painting
  • Painting the trim on the sheds*
*I really, really don't feel like doing that.