My name is Amber and I am a Robin's Egg Blue addict. It was one of my wedding colors. It's also the color of my bedroom, my living room lamps, most of my pottery, my recipe box, my patio chairs, my future kitchen tile...you get the picture. I knew I wanted to paint the front door but I didn't want to fall into my same old pattern, and yet, here we are: my door is the Pinterest equivalent of a basic bitch: Benjamin Moore Wythe Blue and unabashedly pretty. I can't quit you, robin's egg.
From our first visit to the house, I was not feeling the red shutters or the red-toned faux wood fiberglass front door. It felt old-fashioned to me, and I'd been fantasizing about a bright front door like those I saw all over Dublin. I thought that meant I'd have to get a new front door someday that was more my style, but after seeing a friend paint his door that was nearly identical to ours, I felt emboldened. Once we decided to paint the shutters, I knew the house needed a bright touch to balance out its new dark look and became obsessed with virtually painting the door online.
My first thought was Wythe Blue, but it's a little played out in the blogosphere. Seriously, do a search for it on Pinterest or Instagram and you'll see many, many Wythe Blue doors. It's classic for a reason, but I didn't want to be a cliche! So, I got samples of three Sherwin Williams colors (Peppery, Silvermist and Patina Green) from Lowe's and painted these Spot On nifty wall vinyls they sell in the paint section in a three-pack. These are awesome because you can hang them up, move them around and get a good idea of what your future color could look like.
Sean, Katie and I squinted, shaded our eyes, took pictures, looked up close, looked from far away and decided the Patina Green was the best, but still not quite right. Not quite as good as say...Wythe Blue. So I accepted my fate, and packed Sean off to our local BM dealer.
I got very, very lucky on the prep side. Our fiberglass door had never been painted and is protected by a storm door, so it truly only needed to be wiped down with a damp rag. Primer was built into the paint, so all I needed to do was tape the window and hinges, put down a drop cloth and work up the courage for the first stroke! We tried to remove all the hardware but ultimately got intimidated trying to undo the Baldwin lock on the backside of the handle, so I taped and hoped for the best.
I read several good online tutorials that recommended handpainting the insets and tricky corners first before using a smaller roller for the flat panels. I took long breaks between coats to watch 13 Reasons Why and make sure I didn't rush the job. All told, I ended up doing three coats on each side and it didn't take long when you consider I watched so many episodes of the show. It took most of my Saturday, but was 90% done by 6 p.m.
After two coats! I can't say for sure if it would have gone faster if I'd primed first...the paint adhered pretty well, but I'm just a little obsessive and almost always do 2-3 coats on any paint job.
I could not WAIT to pop out and see the door in all its glory and I'm so happy with it. Sean, who indulges all my crazy whims but usually isn't very effusive, was truly impressed. It definitely pops and we don't have any other houses on the block with this color (thank goodness!).
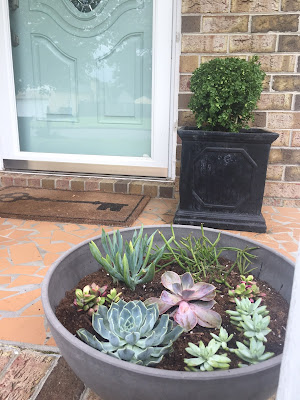
And of course, it's a beautiful complement to a planter of succulents I just put on the porch. By the end of this week, we'll have a new fence in the front, so our curb appeal is definitely getting much, much better! To-do list now includes: cleaning up our mailbox area, mulching the front beds, removing moss growing all over the place, and pressure washing.


1 comment:
I have to admit I wasn't on board at first but it is growing on me and the last picture with the succulents really won me over... I'm old and really like red doors, lol... but I'm always glad you were raised to be your own person!
Post a Comment